Maria stared at the $800 price tag for a simple abstract painting at her local gallery, knowing her budget couldn’t stretch that far. Three hours later, she’d created her first DIY custom artwork using $23 worth of supplies from the craft store—and the result looked so professional that friends started asking who her “artist” was. That weekend project sparked a passion that has since filled her home with dozens of personalized pieces, each one telling her unique story while costing a fraction of commissioned work.
The DIY custom artwork movement has exploded, with 73% of millennials now creating their own art pieces instead of purchasing expensive originals. Pinterest searches for “DIY wall art” have increased by 165% in the past two years, reflecting a growing desire for personalized, budget-friendly home decor that expresses individual creativity and style.
Creating your own custom artwork isn’t just about saving money—it’s about discovering hidden creative talents, expressing personal stories, and filling your space with pieces that carry deep emotional meaning. Unlike store-bought art that anyone can own, DIY custom pieces become conversation starters that reflect your journey, interests, and artistic evolution.
Why DIY Custom Artwork Transforms More Than Just Your Walls
Before diving into specific projects, let’s explore why creating your own custom artwork provides benefits that extend far beyond decoration. The psychological impact of surrounding yourself with self-created art boosts confidence, reduces stress, and creates stronger emotional connections to your living space.
Research from the Creative Arts Therapy Institute shows that people who engage in regular artistic creation report 42% lower stress levels and 38% higher life satisfaction compared to non-creative individuals. Additionally, DIY custom artwork allows for complete personalization—colors, themes, and styles that perfectly match your vision and decor.
The financial benefits are equally compelling. While commissioned custom artwork typically costs $300-$3,000 per piece, DIY alternatives usually require $10-$50 in materials while providing therapeutic benefits and creative satisfaction that money cannot purchase.
9 Beginner-Friendly DIY Custom Artwork Projects That Deliver Professional Results
1. Abstract Fluid Art That Looks Like Expensive Gallery Pieces
Fluid art techniques create stunning abstract compositions using basic acrylic paints and simple tools. This forgiving medium produces beautiful results even for complete beginners, with each piece emerging uniquely based on paint flow and color interaction.
Essential supplies (under $30):
- Canvas boards or stretched canvases
- Acrylic paints in 3-4 coordinating colors
- Plastic cups for mixing
- Wooden stir sticks
- Hair dryer for paint manipulation
The fluid art process involves mixing paints with water or pouring medium, then allowing gravity and movement to create organic patterns. Results often rival expensive abstract paintings while requiring no advanced artistic skills.
Pro tip: Choose colors that complement your existing decor for instant coordination with your space.
2. Personalized Typography Art Using Free Digital Tools
Transform meaningful quotes, song lyrics, or family mottos into stunning typographic artwork using free online design platforms like Canva or GIMP. This approach combines personal meaning with professional-looking results.
Digital typography advantages:
- Unlimited revision possibilities without material waste
- Perfect color matching to existing room palettes
- Various size options from the same design file
- Professional printing options at local print shops
Select fonts that reflect your personality—modern sans-serifs for contemporary spaces, elegant scripts for traditional rooms, or bold display fonts for dramatic impact. Experiment with color gradients, textures, and layouts until achieving desired aesthetic results.
3. Nature-Inspired Botanical Pressing Art
Preserved botanical artwork connects indoor spaces with natural beauty while creating deeply personal pieces that reflect local environments and seasonal changes. This technique produces sophisticated results with minimal artistic experience required.
Botanical pressing process:
- Collect interesting leaves, flowers, or grasses
- Press specimens between heavy books for 2-3 weeks
- Arrange pressed elements on neutral backgrounds
- Frame under glass for professional presentation
Consider creating seasonal series that rotate throughout the year, keeping your artwork fresh while celebrating natural cycles and local flora.
4. Mixed Media Collage That Tells Your Story
Combine photographs, magazine clippings, fabric scraps, and paint to create layered artwork that reflects personal history, interests, or aspirations. Mixed media techniques allow unlimited creativity while producing unique pieces impossible to replicate.
Mixed media inspiration sources:
- Travel photographs combined with maps and ticket stubs
- Family photos integrated with meaningful text elements
- Hobby materials like sheet music for musicians or fabric for sewers
- Color palettes extracted from favorite photographs or memories
This technique works particularly well for creating meaningful gifts that celebrate relationships, shared experiences, or important life events.
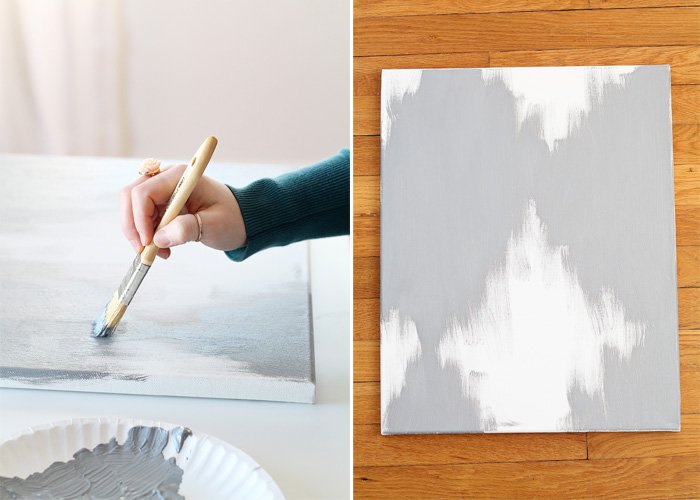
5. Geometric Pattern Art Using Painter’s Tape
Create crisp, modern geometric designs using simple painter’s tape techniques that require no artistic drawing skills. This method produces clean, contemporary artwork perfect for modern interiors.
Geometric tape techniques:
- Plan designs on paper first
- Apply tape in desired patterns to canvas
- Paint over entire surface
- Remove tape while paint is slightly damp for clean lines
Experiment with different tape widths, angles, and color combinations to create patterns ranging from subtle stripes to complex geometric compositions.
6. Photo Transfer Art for Personal Memory Pieces
Transform meaningful photographs into artistic compositions using gel medium transfer techniques that create vintage, ethereal effects impossible to achieve through regular printing.
Photo transfer benefits:
- Unique texture that adds artistic depth
- Vintage appearance that feels timeless
- Personal meaning through familiar imagery
- Conversation starter potential with interesting backstories
This technique works especially well for family portraits, travel photos, or images with strong emotional significance.
7. String Art That Combines Crafting with Artistic Expression
String art creates striking linear compositions using nails, thread, and wooden bases. This technique produces impressive visual impact while remaining accessible to beginners and providing meditative, therapeutic benefits during creation.
String art project ideas:
- Inspirational words spelled out in contrasting thread
- Geometric shapes creating modern abstract designs
- Heart or star patterns for romantic or patriotic themes
- Custom silhouettes of meaningful objects or profiles
Choose thread colors that complement your room’s palette while providing sufficient contrast against background wood tones.
8. Watercolor Resist Technique for Dreamy Effects
Combine watercolors with masking techniques to create ethereal artwork with professional-looking results. This forgiving medium encourages experimentation while producing beautiful, organic effects.
Watercolor resist methods:
- Masking fluid for precise shape preservation
- Wax crayon resist for textured, organic effects
- Salt techniques for crystalline, sparkling appearances
- Alcohol drops for unique circular patterns
Watercolor’s unpredictable nature often creates happy accidents that enhance rather than detract from final compositions.
9. Textured Canvas Art Using Household Items
Create dimensional artwork using everyday household items as texture tools. This innovative approach produces unique surface effects that add visual and tactile interest to custom pieces.
Household texture tools:
- Bubble wrap for interesting dot patterns
- Cardboard edges for linear impressions
- Plastic forks for fine line textures
- Sponges for soft, organic effects
Layer different textures and colors to build complex, sophisticated compositions that invite closer inspection and touch.
Frequently Asked Questions
Absolutely not! Many successful DIY techniques rely more on following processes than innate artistic ability. Techniques like fluid art, string art, and photo transfers produce beautiful results regardless of traditional drawing or painting skills. The key lies in choosing projects that match your comfort level and interests.
Most DIY projects cost $10-$50 in materials, making them incredibly budget-friendly compared to commissioned pieces. Start with basic supplies and gradually invest in higher-quality materials as your skills and interest develop. Many supplies can be reused across multiple projects, further reducing per-piece costs.
Essential supplies include acrylic paints in primary colors plus black and white, various brush sizes, canvas boards, painter’s tape, scissors, and a craft knife. These basics support numerous project types and can be supplemented with specialized materials for specific techniques.
Start with projects requiring minimal precision, like fluid art or botanical pressing. As confidence grows, progress to techniques requiring more control, such as geometric tape designs or detailed mixed media work. Read project instructions thoroughly before beginning to ensure comfort with required techniques.
Focus on proper finishing touches: clean edges, quality framing, consistent color palettes, and appropriate sizing for display spaces. Take time with preparation and cleanup—professional appearance often depends more on attention to detail than complex techniques.
Advanced DIY Techniques for Growing Confidence
Layering and Building Complexity
As basic skills develop, experiment with layering different techniques within single pieces. Combine painted backgrounds with collage elements, or add string art details to botanical compositions. This approach creates unique, sophisticated artwork impossible to purchase elsewhere.
Creating Series and Collections
Develop cohesive artwork series that work together across rooms or seasons. Series creation allows skill refinement while building impressive collections that feel intentionally curated rather than randomly assembled.
Incorporating Personal Photography
Use personal photographs as starting points for artistic interpretation rather than simple printing. Experiment with photo transfers, painting over printed images, or using photos as collage elements within larger compositions.
Tools and Workspace Setup for DIY Success
Essential Tool Investment Priorities
Invest in quality basics that support multiple project types: good brushes, sharp craft knives, and reliable adhesives. Specialized tools can be added gradually as specific interests develop and project complexity increases.
Creating Inspiring Workspaces
Dedicate space for creative work, even if temporary setups on dining tables or kitchen counters. Good lighting, organized supplies, and protected surfaces enable more frequent creative sessions and better results.
Troubleshooting Common DIY Artwork Challenges
Color Mixing and Coordination
Study basic color theory to create harmonious palettes that complement existing decor. Use paint sample cards from hardware stores to test color combinations before committing to projects.
Scale and Proportion Planning
Measure display spaces carefully and create paper templates to visualize artwork size before beginning projects. Most DIY pieces benefit from being slightly larger than initial instincts suggest.
Building Creative Confidence Through Practice
Starting Small and Building Skills
Begin with quick, low-stakes projects that build confidence and skills gradually. Success with simple projects provides motivation to attempt more ambitious creations over time.
Documenting Progress and Growth
Photograph completed projects to track artistic development and identify preferred techniques and styles. This documentation also provides social media content and gift inspiration for friends and family.
Conclusion: Your Creative Journey Starts with One Brave Project
Creating DIY custom artwork transforms more than empty walls—it awakens creativity, builds confidence, and fills homes with meaningful pieces that reflect authentic personality and style. Each project becomes a small victory that encourages further artistic exploration and creative growth.
The beauty of DIY custom artwork lies not in perfection but in personal expression and the satisfaction of creating something unique with your own hands. Whether you complete one meaningful piece or embark on a lifelong artistic journey, you’re joining a community of creators who choose personal expression over mass-produced conformity.
Remember that every expert artist was once a beginner who took that first brave step toward creation. Your walls are waiting for artwork that tells your story, reflects your growth, and celebrates your willingness to try something new.
Start with one project that excites you, gather the basic supplies, and give yourself permission to experiment, make mistakes, and discover hidden talents. The most important step isn’t creating perfect art—it’s beginning the creative journey that will enrich your home and your life in ways you never imagined.
Your custom artwork adventure begins with a single decision to create rather than consume. Take that step, and discover the joy of surrounding yourself with art that comes from your heart, hands, and imagination.