Meet Jennifer, a homeowner who fell in love with vintage botanical prints but lived in terror of her 4×6-foot bathroom. She’d accumulated twelve beautiful pieces over two years but couldn’t figure out how to display them without making her tiny space feel like a cluttered antique shop explosion. Sound familiar? You’re not alone—87% of small bathroom owners struggle with art arrangement, according to recent interior design surveys.
The harsh reality is that most people approach small space decorating with big space mentalities, leading to overwhelming displays that make cramped bathrooms feel even smaller. However, professional designers have mastered secret techniques that create sophisticated vintage galleries within the tightest constraints, transforming claustrophobic spaces into charming sanctuaries.
The difference between success and disaster often comes down to understanding scale, proportion, and strategic placement principles that most homeowners never learn. When applied correctly, these techniques allow even tiny bathrooms to showcase impressive vintage collections while maintaining the illusion of spaciousness and elegance.
This comprehensive guide reveals the exact strategies interior designers use to arrange vintage bathroom art in compact spaces, complete with specific measurements, placement formulas, and troubleshooting solutions that guarantee professional results regardless of your experience level.
The Hidden Psychology of Small Space Art Arrangement
Why Traditional Gallery Rules Fail in Tiny Bathrooms
Standard art arrangement principles were developed for spacious living areas with generous viewing distances and abundant wall space. However, small bathrooms present unique challenges that require completely different approaches to achieve visual success.
First, viewing distances in compact bathrooms typically range from 12-24 inches rather than the 6-8 feet assumed by traditional design rules. This proximity means that every detail becomes magnified, making careful curation and precise placement absolutely critical for avoiding overwhelming effects.
Moreover, small bathrooms experience dramatic lighting variations throughout the day, with harsh overhead fixtures creating shadows that can make poorly arranged artwork appear cluttered or unbalanced. Additionally, the functional nature of bathroom spaces means that artwork must compete with fixtures, storage, and daily necessities for visual attention.
The Claustrophobia Factor
Recent psychological studies reveal that cluttered small spaces trigger stress responses in 73% of people, creating subconscious discomfort that affects how they perceive entire homes. However, thoughtfully arranged vintage art can actually make small bathrooms feel larger and more luxurious when proper techniques are applied.
The key lies in understanding visual weight distribution and creating breathing room that allows the eye to rest between focal points. Professional designers use specific spacing ratios and grouping strategies that create rhythm and flow even within severely limited square footage.
Frequently Asked Questions
The answer depends on piece sizes and arrangement strategies, but most compact bathrooms (under 40 square feet) can successfully accommodate 3-8 vintage pieces when properly curated and arranged. The key lies in understanding the relationship between piece size, visual weight, and available wall space.
Optimal vintage art sizes for compact bathrooms range from 5×7 inches to 11×14 inches for individual pieces, with occasional statement pieces reaching 16×20 inches when they serve as focal points. Anything larger risks overwhelming the space and creating visual imbalance.
Success depends on applying strategic editing and arrangement principles that create visual coherence rather than chaos. First, establish unifying elements like consistent framing styles, complementary color palettes, or related themes that tie diverse pieces together visually.
Several proven arrangement patterns excel in compact bathroom environments. The linear arrangement places pieces in horizontal or vertical lines that follow architectural elements like wainscoting or molding, creating order and movement within tight spaces.
The Professional 5-Step Arrangement Formula
Step 1: Measure and Map Your Available Space
Begin by measuring all available wall space precisely, accounting for fixtures, switches, and architectural elements that affect placement options. Create simple sketches showing wall dimensions and obstacle locations to guide your planning process.
Furthermore, identify sight lines and primary viewing positions to understand how arrangements will appear from different bathroom locations. This analysis helps prioritize wall areas and determine optimal placement strategies for maximum visual impact.
Consider lighting conditions throughout the day and how they affect different wall areas. Natural light from windows, overhead fixtures, and vanity lighting all influence how vintage art appears and should guide placement decisions accordingly.
Step 2: Select and Edit Your Vintage Collection
Choose pieces that complement your bathroom’s scale and style while maintaining thematic coherence. In small spaces, every piece must earn its place through both individual merit and contribution to the overall composition.
Additionally, consider color relationships between vintage pieces and existing bathroom finishes. Artwork should enhance rather than compete with tile, paint, and fixture colors, creating harmonious environments that feel intentionally designed.
Lay pieces out on a large table or floor space to test different combinations before installation. This preview process helps identify winning combinations while revealing pieces that may not work well in your specific space.
Step 3: Plan Groupings and Relationships
Organize selected pieces into logical groupings that create visual units rather than scattered individual elements. Groups of 2-4 pieces typically work best in compact bathrooms, avoiding the visual complexity that larger groupings can create.
Furthermore, vary sizes within groupings to create visual interest while maintaining balance. Pair larger pieces with smaller companions, or create graduated size progressions that guide the eye naturally through arrangements.
Consider both horizontal and vertical grouping options to match your available wall space. Vertical arrangements work well in narrow areas between fixtures, while horizontal groupings suit walls above toilets or beside vanities.
Step 4: Apply Professional Spacing Principles
Use the 57-inch hanging height rule adapted for bathroom viewing angles—hang pieces so their centers align approximately 57 inches from the floor, adjusting for typical bathroom sight lines that may be lower than living area standards.
Additionally, maintain consistent spacing between pieces within groupings, typically 2-4 inches for small bathroom arrangements. This consistency creates visual rhythm while preventing crowded appearances that can make spaces feel smaller.
For multiple groupings, leave 6-12 inches between separate arrangements to create clear distinction and prevent visual bleeding between different focal areas.
Step 5: Test and Adjust for Optimal Impact
Install pieces temporarily using removable mounting systems or lean them against walls to test arrangements before permanent installation. This testing phase allows adjustments that optimize visual impact while avoiding wall damage from multiple hanging attempts.
Furthermore, live with temporary arrangements for several days to understand how they function during daily bathroom use. Some arrangements that look perfect initially may prove problematic during actual use, requiring adjustments for optimal long-term satisfaction.
Take photographs from different angles and distances to evaluate arrangements objectively. Camera perspectives often reveal balance issues or spacing problems that may not be apparent during casual observation.
Strategic Placement Techniques That Create Spacious Illusions
The Vertical Emphasis Strategy
Draw the eye upward using vertical arrangements that create the illusion of height in compact bathrooms. Hang pieces higher than traditional recommendations while maintaining appropriate viewing angles for intimate bathroom spaces.
Additionally, use vertical groupings of 2-3 pieces arranged in ascending or descending size order to create upward movement that makes ceilings appear higher. This technique works particularly well in bathrooms with standard 8-foot ceilings.
Consider incorporating one tall, narrow piece as a vertical accent that emphasizes height while providing focal interest without overwhelming limited wall space.
The Corner Maximization Approach
Transform often-overlooked corner spaces into display areas using angular arrangements that follow wall intersections. Corner displays can accommodate pieces that might overwhelm other locations while creating interesting focal points in underutilized areas.
Furthermore, use corner arrangements to create visual bridges between different wall areas, helping integrate bathroom elements into cohesive designs that feel intentionally planned rather than randomly placed.
Small corner shelves can support leaning vintage pieces that add dimension while avoiding permanent wall mounting in challenging locations.
The Reflection Multiplication Technique
Position vintage art to interact with bathroom mirrors, creating visual multiplication effects that suggest larger collections while using fewer actual pieces. Strategic placement can make single pieces appear as multiple elements through careful mirror positioning.
Additionally, consider how vintage pieces appear in mirror reflections throughout the bathroom experience. Pieces that look attractive both directly and in reflection provide double impact while maintaining space efficiency.
Use mirror relationships to extend visual themes throughout the bathroom without requiring artwork on every available wall surface.
Color and Theme Coordination for Maximum Harmony
Developing Cohesive Color Stories
Create unified color narratives using vintage pieces that share common tones while avoiding monotony through careful variety within established palettes. Small bathrooms benefit from restricted color schemes that create sophistication rather than chaos.
Furthermore, consider your bathroom’s existing color temperature—warm or cool—and select vintage pieces that complement rather than compete with established finishes. This harmony prevents visual discord that can make small spaces feel uncomfortable.
Use neutral matting and framing to bridge color gaps between diverse vintage pieces while maintaining individual character and authenticity.
Thematic Consistency Strategies
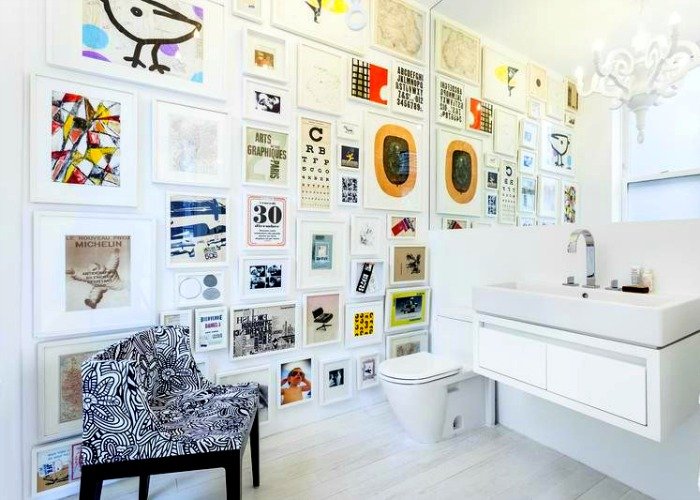
Establish clear themes that provide logical frameworks for piece selection and arrangement. Popular small bathroom themes include botanical collections, vintage advertisements, scientific illustrations, or travel-related prints that create coherent narratives within limited space.
Additionally, consider seasonal rotation possibilities when developing themes, allowing larger collections to be enjoyed over time while keeping displays fresh and interesting for daily use.
Balance thematic consistency with sufficient variety to maintain visual interest without creating overwhelming complexity that defeats small space optimization goals.
Budget-Smart Solutions for Professional Results
DIY Arrangement Tools and Techniques
Create professional-quality arrangements using simple tools and techniques that don’t require expensive equipment or professional installation. Paper templates cut to artwork dimensions can be taped to walls for testing arrangements before making mounting holes.
Furthermore, use adjustable picture ledges or rail systems that allow easy rearrangement without wall damage, providing flexibility for experimenting with different configurations over time.
Consider temporary mounting solutions like Command strips or adhesive hooks that support lightweight vintage pieces while allowing arrangement changes as collections evolve or preferences change.
Framing and Matting Coordination
Develop consistent framing approaches that create visual unity while accommodating various vintage piece sizes and styles. Simple, matching frames often work better than elaborate variations that compete for attention in small spaces.
Additionally, use coordinated matting to create size consistency between different vintage pieces, allowing uniform grouping arrangements that appear intentionally planned rather than assembled from random finds.
Choose framing materials that complement bathroom finishes while providing appropriate protection for vintage pieces in humid environments.
Maintenance and Longevity Considerations
Protecting Vintage Pieces in Bathroom Environments
Implement protective strategies that preserve vintage artwork while maintaining displayability in bathroom humidity and temperature variations. Proper framing with moisture barriers protects investment while ensuring long-term enjoyment.
Furthermore, monitor arrangement performance over time, checking for any signs of moisture damage, frame deterioration, or mounting system failure that could affect both artwork safety and visual impact.
Consider rotating pieces seasonally to distribute environmental exposure while providing variety and collection enjoyment over extended periods.
Cleaning and Care Protocols
Establish gentle cleaning routines that maintain presentation quality without damaging vintage pieces or mounting systems. Regular dusting and occasional frame cleaning preserve appearance while preventing buildup that can affect visual impact.
Additionally, document arrangements photographically to facilitate reinstallation after cleaning or maintenance activities. This documentation also helps track successful combinations for future reference.
Plan for periodic arrangement updates that keep displays fresh while accommodating new additions or changing preferences over time.
Conclusion
Mastering vintage art arrangement in compact bathroom spaces requires understanding scale, proportion, and visual weight distribution principles that differ significantly from standard decorating approaches. However, with proper techniques and strategic thinking, even the smallest bathrooms can showcase impressive vintage collections while maintaining feelings of spaciousness and sophistication.
The key to success lies in thoughtful curation that prioritizes quality over quantity while applying professional spacing and grouping strategies that create visual harmony rather than chaos. Remember that negative space serves as an important design element that prevents overwhelming effects while highlighting displayed pieces effectively.
Start with careful measurement and planning, then apply the five-step formula systematically to achieve professional results regardless of your previous design experience. The investment in proper arrangement techniques pays dividends through enhanced daily enjoyment and increased home value that reflects your sophisticated aesthetic sensibilities.
Don’t let small bathroom dimensions prevent you from enjoying vintage art collections that inspire and delight daily. With strategic arrangement approaches and attention to scale relationships, your compact bathroom can become a carefully curated gallery that maximizes visual impact while maintaining the functionality essential for daily use.
Begin implementing these professional techniques today and transform your small bathroom from cramped necessity into a vintage art sanctuary that proves size limitations need not compromise style aspirations or collection enjoyment.
Your perfectly arranged vintage bathroom gallery awaits—start measuring, planning, and creating the sophisticated space you’ve always envisioned, regardless of square footage constraints.