Maria stared at her collection of vintage French bakery posters, completely overwhelmed by the blank kitchen walls surrounding her. She’d spent months hunting down these perfect pieces at flea markets and antique shops, but now faced the paralyzing question: where exactly should she hang them for maximum visual impact?
Sound familiar? You’re not alone. Studies show that 78% of homeowners struggle with artwork placement, and kitchens present unique challenges that can make or break your entire design scheme. The wrong placement turns stunning vintage pieces into overlooked afterthoughts, while strategic positioning transforms them into conversation-starting focal points that elevate your entire space.
The secret lies in understanding your kitchen’s “power zones” – specific areas where vintage art doesn’t just hang on walls, it commands attention, tells stories, and creates the warm, inviting atmosphere that makes your kitchen the heart of your home. These seven strategic locations will help you maximize your investment while creating a space that feels both professionally designed and deeply personal.
Understanding Kitchen Visual Hierarchy and Flow Patterns
Before diving into specific placement zones, it’s crucial to understand how people naturally move through and experience kitchen spaces. Eye-tracking studies reveal that visitors follow predictable patterns when entering kitchens, and strategic artwork placement can guide these visual journeys.
The primary sight lines in most kitchens flow from the main entrance toward the cooking area, then sweep across work surfaces before settling on focal points like islands or breakfast areas. Vintage art positioned along these natural paths receives maximum attention while pieces placed outside this flow often go unnoticed despite their beauty.
Kitchen lighting also dramatically affects artwork visibility throughout the day. Morning light streams differently than evening illumination, and under-cabinet lighting creates distinct viewing conditions that can either enhance or diminish your vintage pieces’ impact. Understanding these patterns helps you choose locations where your art looks stunning regardless of time or lighting conditions.
Additionally, consider the emotional psychology of kitchen spaces. Vintage art serves dual purposes – it provides visual interest and creates emotional connections to simpler times. Positioning pieces where people naturally pause or gather amplifies these emotional responses while maximizing your investment’s impact.
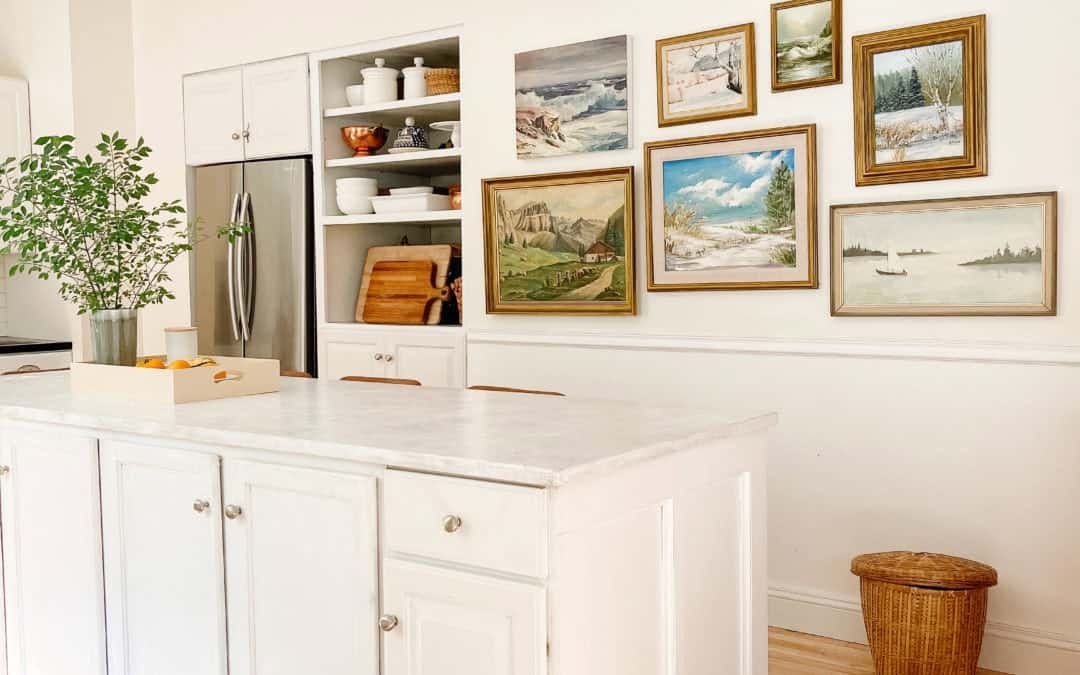
Zone 1: The Grand Entrance Gallery Wall
Your kitchen entrance offers prime real estate for creating immediate visual impact that sets the tone for your entire space. This area receives consistent foot traffic and benefits from natural curiosity as people enter and survey the room.
Gallery walls work exceptionally well in entrance zones because they create impressive visual statements that draw people deeper into your kitchen. Group vintage pieces by theme – such as French advertisements, botanical prints, or coffee-related artwork – to create cohesive collections that tell compelling stories.
Maintain consistent spacing between frames, typically 2-3 inches for smaller pieces or 3-4 inches for larger artwork. This creates visual harmony while allowing each piece to maintain its individual character. Consider varying frame sizes within your collection to add dynamic interest without sacrificing cohesion.
Position your gallery wall at eye level for average-height adults, approximately 57-60 inches from floor to center of artwork. This standard museum height ensures comfortable viewing while maintaining professional appearance that impresses guests and family members alike.
Zone 2: Above the Sink Command Center
The area above your kitchen sink presents unique opportunities for vintage art placement, as this location receives extended attention during daily dish-washing and food preparation activities. However, moisture considerations require careful planning and appropriate protection measures.
Choose vintage pieces with kitchen-appropriate themes for this location – herb gardens, vintage dish soap advertisements, or charming cafe scenes complement the functional nature of sink areas. These thematic connections create natural harmony between form and function.
Install UV-filtering glass and maintain adequate distance from splash zones to protect your vintage investments. Position artwork at least 12 inches above sink level and consider tile backsplashes that extend upward to create protective barriers against water damage.
Window placement near sinks often provides excellent natural lighting that enhances vintage colors and details during daytime activities. However, direct sunlight can fade artwork over time, so consider UV-filtering window treatments that protect your pieces while maintaining bright, cheerful ambiance.
Zone 3: The Breakfast Nook Sanctuary
Breakfast nooks offer intimate settings where vintage art creates cozy atmosphere perfect for morning routines and casual family conversations. This zone benefits from extended viewing time as people linger over meals and beverages.
Create themed collections that enhance morning experiences – vintage coffee advertisements, botanical herb prints, or charming farm-to-table imagery work particularly well in breakfast areas. These pieces spark conversations while contributing to relaxed, welcoming environments.
Consider banquette seating arrangements when planning artwork placement. Pieces positioned behind seating areas should hang higher than standard eye level to remain visible over seated occupants’ heads. Alternatively, side walls offer excellent visibility without obstruction issues.
Breakfast nook lighting often combines natural window light with pendant fixtures, creating dynamic viewing conditions throughout the day. Plan your vintage art placement to take advantage of these varying light sources while avoiding harsh glare that might obscure details.
Zone 4: Kitchen Island Focal Points
Kitchen islands serve as natural gathering spots that benefit from carefully positioned vintage art on surrounding walls. These central locations offer 360-degree viewing opportunities that maximize artwork visibility from multiple angles.
Large statement pieces work exceptionally well in island areas because they provide sufficient visual weight to anchor the space without competing with functional elements. Vintage signs, oversized botanical prints, or collection displays create impressive focal points that enhance rather than overwhelm island functionality.
Consider ceiling height when selecting artwork for island areas. Standard 8-foot ceilings may require horizontally-oriented pieces, while higher ceilings accommodate vertical displays that draw eyes upward and create illusions of expanded space.
Pendant lighting over islands can create dramatic accent lighting for vintage artwork when positioned strategically. Adjustable fixtures allow you to highlight specific pieces during evening hours while maintaining functional task lighting for food preparation activities.
Zone 5: Open Shelving Integration Displays
Open shelving systems provide unique opportunities to integrate vintage art within functional storage areas, creating dynamic displays that blend form and function seamlessly. This approach maximizes wall space utilization while creating visually interesting collections.
Lean smaller vintage pieces against back walls of open shelves, interspersing them with functional items like dishes, glassware, or cookbooks. This integration technique creates layered visual interest that feels both intentional and naturally evolved over time.
Vary heights and angles of leaned artwork to prevent static, museum-like appearances. Slightly overlapping pieces or mixing orientations creates casual, lived-in aesthetics that complement vintage styles while maintaining sophisticated design principles.
Consider lighting within or below open shelving to illuminate both functional items and artwork displays. LED strip lighting provides even illumination that enhances vintage colors while maintaining energy efficiency and heat control appropriate for kitchen environments.
Zone 6: Dining Area Statement Walls
Kitchen dining areas offer opportunities for large-scale vintage art installations that create dramatic focal points visible from multiple rooms. These locations benefit from extended viewing time during meals and entertaining.
Oversized vintage pieces or large-scale reproductions work particularly well in dining areas because they provide sufficient visual impact to anchor seating arrangements while creating conversation-starting focal points for guests and family members.
Position artwork at appropriate height relative to dining furniture. Standard dining chairs require artwork placement at 60-66 inches from floor to center, while bar-height seating needs pieces positioned 66-70 inches high for optimal viewing angles.
Consider the relationship between dining area artwork and kitchen sightlines. Pieces should remain visible from cooking areas to maintain visual flow between functional zones while providing pleasant views during food preparation activities.
Zone 7: Corner Nooks and Awkward Spaces
Kitchen corners and oddly-shaped areas often become wasted space, but strategic vintage art placement transforms these challenging zones into charming vignettes that add character and visual interest to your overall design.
Small-scale vintage collections work beautifully in corner arrangements, creating intimate displays that reward closer inspection. Vintage spice labels, miniature advertisements, or botanical specimen prints suit these locations perfectly.
Floating corner shelves combined with vintage art create three-dimensional displays that maximize limited space while providing both storage and decoration. This approach works particularly well in smaller kitchens where every square inch matters.
Lighting corner displays requires creative solutions since these areas often lack natural or overhead illumination. Battery-operated picture lights or small accent fixtures provide focused illumination that highlights vintage details without requiring extensive electrical work.
Frequently Asked Questions
Standard museum height of 57-60 inches from floor to artwork center works well for most locations, but adjust based on nearby furniture and viewing angles. Above counters, maintain 12-18 inches clearance for functional access.
Use UV-filtering glass, maintain adequate distance from cooking areas, ensure proper ventilation, and clean frames regularly. Consider climate-controlled display cases for extremely valuable pieces.
Absolutely! Mixing decades creates visual richness and prevents museum-like stiffness. Focus on consistent color palettes or themes rather than strict chronological matching for cohesive results.
Scale artwork to your space – large pieces for dining areas and islands, medium pieces for galleries and sink areas, small pieces for shelving integration and corner displays.
While coordination helps, vintage pieces often work best when introducing complementary accent colors rather than exact matches. This approach adds visual interest while maintaining harmonious flow.
Professional Styling Techniques for Maximum Impact
Layering techniques elevate vintage art displays from simple wall hangings to sophisticated design elements. Combine framed pieces with three-dimensional objects like vintage scales, antique utensils, or ceramic pieces to create depth and visual texture.
Create visual triangles by grouping three elements of varying heights and sizes. This classic design principle works particularly well with vintage collections, guiding eyes naturally through displays while maintaining balanced compositions.
Use consistent framing styles within individual displays while varying them between different zones. This approach unifies collections while preventing monotony across your entire kitchen space.
Consider seasonal rotation strategies that allow you to showcase different pieces throughout the year. This keeps your displays fresh while protecting individual pieces from extended exposure to kitchen conditions.
Lighting Your Vintage Art Collection
Proper lighting transforms good vintage art placement into spectacular displays that command attention and enhance your kitchen’s overall ambiance. Natural light provides excellent color rendition during daytime hours, but artificial lighting ensures consistent visibility regardless of weather or season.
LED picture lights offer focused illumination that highlights vintage details without generating heat that might damage delicate materials. Battery-operated versions provide installation flexibility in areas where electrical access is limited or expensive.
Under-cabinet lighting can effectively illuminate artwork positioned on backsplashes or lower wall areas. Choose warm color temperatures that complement vintage aesthetics while providing sufficient brightness to reveal fine details and subtle colors.
Avoid direct spotlights that create harsh shadows or glare on glass-covered pieces. Instead, use diffused lighting that provides even illumination across entire artwork surfaces for optimal viewing experiences.
Creating Cohesive Collections Across Multiple Zones
Develop overarching themes that connect vintage pieces across different kitchen zones while allowing individual areas to maintain distinct personalities. Color palettes, historical periods, or subject matters can provide unifying elements that create sophisticated, intentional designs.
Repeat key colors or motifs throughout your kitchen to create visual flow between different artwork zones. This technique helps smaller spaces feel larger while making larger kitchens feel more cohesive and thoughtfully designed.
Consider the relationship between vintage art and your kitchen’s architectural elements. Complement existing features like exposed beams, brick walls, or vintage hardware rather than competing with them for attention.
Document your collection with photographs to track placement effectiveness and plan future additions. This visual record helps you identify successful combinations while avoiding costly placement mistakes.
Conclusion: Transforming Your Kitchen into a Vintage Showcase
Strategic vintage art placement transforms ordinary kitchens into extraordinary spaces that celebrate both culinary function and aesthetic beauty. By understanding your kitchen’s natural flow patterns and identifying key visual zones, you can position your treasured pieces where they’ll create maximum impact while remaining protected from kitchen hazards.
Remember that successful vintage art display requires patience and experimentation. Start with one zone, perfect your approach, then expand to additional areas as your confidence and collection grow. Each piece should contribute to your kitchen’s overall story while maintaining its individual character and charm.
Your kitchen represents more than just a cooking space – it’s where families gather, memories are made, and traditions are passed down. Vintage art placement that honors both function and beauty creates environments that nurture these important connections while showcasing your personal style and collecting passion.
Take action today by identifying your kitchen’s primary zones and selecting your first vintage piece placement. With these expert strategies as your guide, you’ll create a kitchen that impresses guests while providing daily joy and inspiration for years to come.
The perfect vintage kitchen display awaits – it’s time to transform your walls into storytelling galleries that celebrate both past and present in perfect harmony.