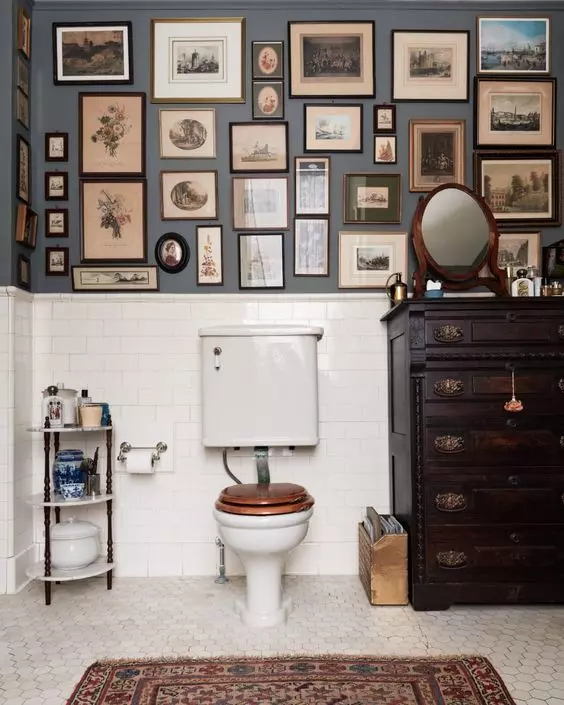
Walking into a professionally designed bathroom, you’re instantly struck by how effortlessly elegant the vintage art arrangements appear – every piece perfectly positioned, creating sophisticated gallery walls that seem to have evolved naturally over time. Meanwhile, your own attempts at arranging vintage bathroom art feel stilted, chaotic, or just plain wrong, despite investing in beautiful individual pieces that should work together harmoniously.
The frustrating truth is that professional interior designers possess closely guarded arrangement secrets developed through years of expensive trial-and-error, client feedback, and formal training that most homeowners never access. These techniques transform ordinary vintage art collections into museum-quality displays that elevate entire bathroom environments while creating the kind of sophisticated ambiance typically reserved for luxury hotels and high-end spas.
Today, we’re pulling back the curtain on these exclusive professional strategies, revealing the exact arrangement techniques that top designers use to create stunning vintage bathroom galleries. These aren’t vague aesthetic suggestions – they’re precise, actionable methods that deliver immediate, dramatic improvements to any vintage art collection regardless of your budget, space constraints, or previous design experience.
The Psychology Behind Professional Art Arrangements
Understanding why certain arrangements feel instantly “right” while others create visual discord requires knowledge of how our brains process spatial relationships and visual information. Professional designers leverage cognitive psychology principles that trigger positive emotional responses, making viewers feel comfortable and engaged rather than overwhelmed or confused.
Visual Weight Distribution and Balance
Research from the Rhode Island School of Design demonstrates that successful art arrangements follow specific mathematical relationships that create perceived balance even when pieces vary dramatically in size, color, or subject matter. Professional designers instinctively apply these proportion rules, distributing visual weight according to the golden ratio and other geometric principles that feel naturally harmonious to human perception.
Visual weight encompasses more than physical size – dark colors appear heavier than light ones, busy patterns carry more weight than simple designs, and textured surfaces seem heavier than smooth ones. Master designers balance these elements across entire wall compositions, creating arrangements that feel stable and resolved rather than lopsided or chaotic.
Eye Movement Patterns in Gallery Walls
Professional arrangements guide viewers’ eyes through planned pathways that create engaging visual journeys. Eye-tracking studies reveal that successful gallery walls establish clear entry points, create flowing movement between pieces, and provide comfortable resting spots that prevent visual fatigue.
Designers use this research to position their strongest pieces at natural focal points while arranging supporting works to create rhythmic progressions that keep viewers engaged without overwhelming their processing capacity. This strategic approach explains why professional arrangements feel effortlessly sophisticated while amateur attempts often seem cluttered or disconnected.
15 Professional Vintage Bathroom Art Arrangement Secrets
1. The Anchor Point Strategy
Start every arrangement with your most significant piece positioned at eye level in the wall’s visual center. This anchor point establishes the entire composition’s scale, style, and emotional tone while providing a stable reference for positioning all supporting pieces.
Professional designers choose anchor pieces based on visual impact rather than monetary value – a large botanical print with strong colors might anchor better than a smaller original painting. Once positioned, the anchor determines spacing, scale relationships, and color coordination for every additional piece.
2. The 57-Inch Rule Application
Hang artwork centers at exactly 57 inches from the floor – the standard gallery height that accommodates most viewer heights comfortably. This measurement applies to individual pieces and gallery wall centers, ensuring optimal viewing angles regardless of whether viewers are standing or seated.
Adjust this height slightly in bathrooms with unusually high or low ceilings, but maintain consistency across all pieces to create professional cohesion. Many amateur arrangements fail because they ignore this fundamental height standard, creating compositions that feel unstable or awkward.
3. Strategic Spacing Mathematics
Maintain 2-3 inches between smaller pieces (under 11×14) and 4-6 inches between larger works, adjusting based on frame styles and wall dimensions. Professional designers use these measurements as starting points, fine-tuning based on visual weight and style relationships between adjacent pieces.
Consistent spacing creates visual rhythm and prevents the chaotic appearance that results from random placement decisions. Use paper templates cut to actual frame sizes to test arrangements before committing to wall holes – a technique professionals use to perfect compositions before installation.
4. The Triangle Composition Method
Arrange three pieces in triangular relationships that create stable, visually satisfying compositions. This might involve positioning two smaller pieces flanking a larger central work, or creating asymmetrical triangles that add dynamic energy while maintaining balance.
Triangle arrangements work at multiple scales – within individual groupings and across entire wall compositions. Professional designers often create nested triangular relationships that provide both intimate viewing experiences and satisfying overall compositions.
5. Color Echo Technique
Repeat significant colors from your strongest piece throughout the arrangement, creating visual connections that unify diverse vintage styles and periods. This might involve echoing the green tones from a botanical print in smaller accent pieces positioned strategically around the composition.
Limit color echoes to 3-4 hues maximum to prevent overwhelming complexity. Professional designers often choose one dominant color (60% of the arrangement), one secondary color (30%), and one or two accent colors (10%) to create sophisticated, resolved palettes.
6. Scale Progression Sequencing
Vary piece sizes in predictable rhythms that create visual music rather than random cacophony. Professional arrangements often progress from large to small (or vice versa) in flowing sequences that guide the eye smoothly through the composition.
Avoid clustering all large pieces together or scattering tiny pieces randomly. Instead, create conversational groupings where differently sized pieces interact meaningfully while contributing to the overall compositional flow.
7. Frame Style Unification
Achieve instant professionalism by reframing diverse vintage pieces in consistent profiles, materials, and colors. This single investment transforms chaotic collections into sophisticated galleries that appear deliberately curated rather than accidentally assembled.
Choose frame styles that complement your most valuable pieces, then apply consistently across the entire arrangement. Simple profiles often work better than ornate options that compete with vintage artwork for visual attention.
8. Lighting Integration Planning
Position arrangements to take advantage of natural light while incorporating artificial illumination that highlights key pieces during evening routines. Professional designers consider lighting conditions throughout daily cycles, ensuring arrangements remain visually effective regardless of time or weather.
Install picture lights or track systems with warm LED bulbs that enhance vintage colors without generating heat that could damage delicate pieces. Proper lighting transforms good arrangements into stunning focal points that rival professional gallery displays.
9. Negative Space Utilization
Embrace empty wall areas as active compositional elements rather than spaces requiring filling. Professional arrangements achieve sophistication through restraint, allowing individual pieces breathing room while preventing visual claustrophobia that overwhelms viewers.
Calculate negative space mathematically – successful arrangements typically feature 30-40% empty space distributed strategically around and between pieces. This proportion provides visual rest areas essential for comfortable contemplation and appreciation.
10. Style Period Bridging
Use transitional pieces to connect different vintage periods smoothly, creating historical progressions that feel educational and intentional rather than randomly assembled. This technique allows you to display diverse collecting interests while maintaining compositional harmony.
Research historical relationships between your chosen periods, positioning pieces chronologically when possible. Art Nouveau works often bridge Victorian and mid-century pieces effectively, while 1940s photography can connect earlier and later vintage periods naturally.
11. Sight Line Optimization
Position key pieces where they’re visible from bathroom entry points, bathing areas, and vanity locations. Professional designers map sight lines systematically, ensuring arrangements enhance rather than compete with functional bathroom activities.
Consider how arrangements appear from different positions – seated on the toilet, standing at the sink, or relaxing in the bathtub. Strategic positioning ensures vintage art enhances every bathroom experience rather than being relegated to occasional appreciation.
12. Seasonal Rotation Systems
Plan arrangements that accommodate seasonal changes and new acquisitions without requiring complete reinstallation. Professional designers create flexible systems that allow evolution while maintaining overall compositional integrity.
Designate specific positions for rotating seasonal pieces, maintaining core arrangements while adding variety that prevents visual staleness. This approach protects valuable pieces from continuous humidity exposure while keeping arrangements fresh and engaging.
13. Protection Priority Positioning
Position most valuable or moisture-sensitive pieces away from direct steam exposure while ensuring visibility from primary bathroom locations. Professional designers balance conservation needs with aesthetic impact, maximizing both artwork safety and viewer enjoyment.
Create microclimates using strategic dehumidifier placement or improved ventilation that enable safe display of sensitive pieces in optimal viewing positions. Investment in environmental controls justifies itself by protecting valuable collections while enhancing daily bathroom experiences.
14. Gallery Wall Template Systems
Create paper templates matching exact frame dimensions to test arrangements before making wall commitments. Professional designers always mock up complex arrangements, adjusting compositions until achieving optimal balance and visual flow.
Tape templates to walls and live with arrangements for several days, observing how they feel during different lighting conditions and daily activities. This patient approach prevents costly mistakes while ensuring final arrangements meet both aesthetic and functional requirements.
15. Professional Installation Techniques
Use appropriate hanging hardware rated for frame weights and bathroom humidity conditions. Professional installers choose gallery-grade picture wire, security hardware, and wall anchors that ensure arrangements remain stable and secure over time.
Invest in quality installation tools including laser levels, stud finders, and precision measuring devices. Professional-quality installation elevates any arrangement while preventing damage to both walls and artwork that results from amateur hanging attempts.
Frequently Asked Questions
Professional designers recommend 5-9 pieces maximum for standard bathroom walls (8-10 feet wide). More pieces often overwhelm smaller spaces while fewer pieces can appear sparse and unfinished. Odd numbers typically create more visually satisfying arrangements than even groupings.
Always plan arrangements before acquiring new pieces. Professional designers create detailed wall plans that guide purchasing decisions, ensuring new acquisitions integrate successfully with existing collections rather than creating composition problems that require expensive adjustments.
If stepping back and squinting at your arrangement reveals obvious visual problems – clustering, imbalance, or chaotic movement patterns – consider professional consultation. Many interior designers offer hourly arrangement services that provide immediate improvements and long-term learning opportunities.
Mixed frame colors can work when unified by other elements like consistent profiles, coordinated matting, or shared metallic finishes. However, consistent frame colors provide the easiest path to professional-looking results, especially for beginners developing arrangement skills.
The most common error is positioning pieces too high on walls, creating disconnection from viewers and bathroom activities. Professional arrangements prioritize eye-level positioning and sight line optimization over filling empty wall space at inappropriate heights.
Advanced Professional Techniques
Creating Visual Conversations
Position related pieces to create dialogues across wall spaces – botanical prints might “converse” with nature photography while maintaining appropriate spacing and scale relationships. Professional designers think narratively, creating arrangements that tell stories through carefully planned visual relationships.
Proportion Mathematical Applications
Apply professional proportion systems including the rule of thirds, golden ratio, and fibonacci sequences to create mathematically satisfying arrangements. These systems provide objective frameworks for subjective aesthetic decisions, ensuring arrangements feel resolved and harmonious.
Museum-Quality Presentation Standards
Adopt conservation-grade materials and techniques that protect valuable pieces while presenting them optimally. Professional standards include UV-protective glazing, acid-free matting, and climate-controlled positioning that preserves collections while maximizing visual impact.
Budget-Conscious Professional Techniques
Strategic Investment Priorities
Focus spending on consistent, quality framing rather than expensive artwork, achieving professional appearance through presentation excellence. Quality frames transform modest vintage finds into sophisticated design elements that rival expensive original pieces.
DIY Professional Tools
Acquire basic professional tools including laser levels, picture wire, and quality hanging hardware that enable precise installation. These one-time investments pay dividends through improved arrangement quality and reduced wall damage from repeated adjustments.
Gradual Collection Building
Develop arrangements systematically over time rather than attempting complete installations immediately. Professional designers often take months perfecting complex arrangements, allowing compositions to evolve naturally through careful observation and thoughtful adjustments.
Conclusion
Mastering professional vintage bathroom art arrangement transforms your space from amateur attempt to sophisticated sanctuary that rivals the most exclusive design destinations. These 15 insider techniques provide the foundation for creating museum-quality displays that enhance your daily routines while protecting valuable collections and expressing your unique aesthetic vision.
The journey from chaotic wall hangings to professional-quality arrangements requires patience, practice, and systematic application of these proven principles. However, the transformation rewards every effort invested, creating bathroom environments that feel intentionally curated and effortlessly elegant rather than accidentally assembled.
Start implementing these professional secrets today, beginning with the anchor point strategy and building complexity gradually as your confidence and skills develop. Remember that professional designers achieve mastery through experimentation and refinement – embrace the process while trusting these proven techniques to guide your vintage art arrangement journey toward increasingly sophisticated and personally satisfying results.